Manipulating Brew Variables on the Argos
THIS PAGE IS A WORK IN PROGRESS
Below are the main brew variables you can manipulate on the Argos to experiment with and brew different espresso styles
For a simple step-by-step guide on how to apply these brew variables into your dialling-in routine, check out our guide here.
Since the Argos has two modes (Direct vs. Spring) where the lever moves in opposite directions to raise or lower the piston, in this guide we’ll refer to piston position and movement (eg. raise the piston/lower the piston) rather than lever movement for clarity.
Spring configuration:
- Piston is raised by depressing the lever
- Piston is lowered by lifting the lever
Direct configuration:
- Piston is raised by lifting the lever
- Piston is lowered by depressing the lever

Before we talk about how to manipulate brew variables, it’s important to first understand how a dipper lever like the Argos works.
Brew Phases:
Chamber fill > Soak/"Pre-infusion" > Percolation > Shot end
Chamber fill:
Raising the piston opens a pathway between the boiler and the brew chamber via the dipper tube. At first, the flow rate is relatively fast, driven directly by boiler pressure with little resistance from the puck. As water fills the brew chamber, air is displaced through the piston’s bleed valve and the coffee puck.
Soak:
The flow rate then slows down naturally as the chamber fills, the puck swells to create resistance to flow, and pressure equalizes between the boiler and the brew chamber.
Though there is of course an overlap, as water is already in contact with the puck while the chamber continues to fill, for ease of discussion, we will consider the soak phase as separate to and taking place after the chamber is filled.
Percolation:
Once the piston bleed valve closes and the puck is fully saturated, any flow from the boiler to the grouphead can only happen if the puck allows espresso to drip through.
Percolation is when the piston starts to lower, water is pushed through the puck. We'll call this phase the percolation phase.
Click the links to skip ahead to your desired topic
- Brew Chamber Fill Rate
- Puck Soak Duration
- Brew Flow Rate (Percolation)
- Brew Pressure Curve
- Brew Temperature
- Espresso Output
Brew Chamber Fill Rate
The rate of water entering the brew chamber depends on
-
boiler pressure
The higher the boiler pressure, the faster the initial flow rate during the fill
-
whether you have the restrictor valve installed
Removing the restrictor valve will increase fill rate
-
how much of the inlet orifice you expose when you raise the piston
The wider the opening of the inlet orifice, the higher the flow of water into the brew chamber
Summary:
| Decrease Fill Rate | Increase Fill Rate |
|
- Lower boiler pressure (flush grouphead to warm it, vent steam, lower brew temp) - Use restrictor valve - Partially expose inlet orifice when raising piston |
- Increase boiler pressure (raise temp, keep grouphead cool) - Remove restrictor valve - Expose more of entire inlet orifice when raising piston |
Puck Soak ("Pre-Infusion") Duration and Pressure
This stage is colloquially known as "pre-infusion", however I prefer to call this stage the soak.
I find the term 'Pre-infusion' a misnomer as coffee infusion starts as soon as water hits the grounds.
With the Argos, you can manipulate both the duration and pressure of the soak.
Duration
This is a simple one - to extend the soak phase, leave the piston in the raised position for as long as you desire. Lower the piston once you want to start the percolation phase.
One 'complication' you may run into is that your puck may not have enough resistance to prevent espresso from flowing through the puck during this phase. If this bothers you, you can grind finer to increase puck resistance. There are rare exceptions in which the puck will not resist flow if pressure/compression is 'too low' - this tends to depend on the coffee as well as the burrs you are using. If this happens, you can apply more pressure during the soak to further compress the puck.
Pressure;
Boiler pressure soak:
The simplest option for a pressurised soak is to use boiler pressure. Fill the chamber as usual, raising the piston all the way. Once the chamber is fully filled, allow the puck to soak at boiler pressure for as long as desired.
Note that the Argos' boiler pressure is dictated by desired brew pressure
Note:
While a main feature of the Argos that sets it aside from most other manual levers is it's excellent brew temperature algorithm, this does prioritise stable brew pressure over stable 'pre-infusion' pressure.
If you would like your Argos to behave more like a traditional lever machine, you can 'over-ride' the temperature algorithm by manually 'selecting' what boiler pressure you would like to brew at. Do this by clicking your Argos into steam mode, forcing it to continue to heat the boiler. If left on its own, the boiler will stop heating once it reaches about 3 bars of pressure. You can interrupt this heating when your boiler reaches your desired pressure (eg. 2 bar). Click the temperature knob again to stop it from heating. Your boiler will stay at this pressure for long enough to start then start your shot.
Soak above boiler pressure:
Fill the chamber as usual, raising the piston all the way. Once the chamber is fully filled and the puck is fully saturated, you can lower the
While the lever is static, pressure will eventually dissipate through the puck. As this happens, you will see the pressure reading on the brew gauge start to fall. How quickly this decline happens is affected by puck resistance - If you're finding it difficult to maintain high puck soak pressure for the desired duration of your soak, try grinding finer or using a larger dose
Soak below boiler pressure:
During the fill, only lift the piston high enough to open the brew chamber to the boiler. Once the puck is saturated, lower the piston slightly to cover the water inlet orifice and close off the boiler. When you lower the piston, pressure will increase slightly, but will eventually dissipate through the puck. As this happens, you will see the pressure reading on the brew gauge start to fall.
How quickly this decline happens is affected by puck resistance - the finer the grind, the slower this pressure will dissipate, and vice versa
Effects on espresso
Generally speaking, a longer soak lends itself to higher possible flow rates during the percolation stage.
You can use this to your advantage if you find that you've accidentally "choked" your shot, can can try to save it by adding a longer, low pressure soak. Ideally this will allow you to eventually get some flow through the puck, 'saving' your shot and saving you from attempting to remove your portafilter while the system is under pressure.
Some worry that shots like this with excess shot times (50+ plus seconds) will taste terrible, but you'd be surprised how tasty they can still be. I like to explain this with one simple phrase: lever magic :)
Alternatively, if you're wanting to slow down flow rate, minimise how long your shot stays in this soak phase
Brew Flow Rate (Percolation stage)
When the piston is lowered and seals the brew chamber off from the boiler, flow rate through the puck is no longer determined by boiler pressure but by how quickly the piston displaces water in the brew chamber.
If we ignore the effects of puck compression on puck resistance then we can generally say that for any given grind size, faster piston displacement = faster flow
This is only true up to a point, as there will come a point in which grinding finer will start to decrease percolation flow rate.
Puck compression and its relationship to puck resistance (which in turn can determine flow rate or vice versa) also plays a role. If the puck is being compressed to a point where the resistance generate is higher than the force exerted by the piston, flow rate will slow and then stop. Folks sometimes call this a "choked" shot.
If this is an issue that you're running into, the fix would be to lower the piston more slowly so as to compress the puck less. In short, sometimes lower brew pressures can increase flow rate.
Other ways to increase percolation flow rate are
- increasing soak duration (see above)
- increasing brew temperature (hotter water tends to flow through pucks more easily)
See here for a deeper understanding on how flow rate affects taste
https://espressoaf.com/guides/preferential-extraction.html#flow-rate
Brew Pressure Curve
Brew pressure in the Argos is measured at the brew chamber. In simple terms, brew pressure is result of force from the water column (boiler pressure and pressure/force from the piston) interacting with the resistance from the puck (grind size/distribution and viscosity of extraction espresso).
Spring Configuration
In Spring Configuration, the spring's decompression creates a pressure curve that begins at peak rated pressure (6 or 8 bar) and naturally declines over time as the spring decompresses.
the steepness of that pressure decline isn’t fixed, it is directly influenced by how much resistance the puck provides to the flow of water.
That said, you can manipulate the movement of the lever and thus interrupt the natural decompression of the spring, thus changing the shape of the pressure curve. Assist the spring (push up on the lever) to increase brew pressure or retard the rise of the lever to decrease brew pressure.
Note: A common misconception is that grinding finer increases peak brew pressure while in Spring Config. In truth, peak pressure is lost from poor air bleed or incomplete puck saturation. Grinding finer only makes saturation harder, preventing the machine from reaching true peak pressure.
If you are struggling to hit peak rated spring pressure, see here for tips
Direct Configuration
In a direct lever machine, you apply pressure directly to the water column by pulling down on the lever, which moves the piston in the brew chamber. Together with adjusting grind sizer, adjust the force you exert on the lever to either increase or decrease brew pressure.
Note:
Brew pressure can be viewed not as a primary variable you control directly, but as a secondary outcome shaped by other factors like flow rate, grind size, burr geometry, water temperature, and the coffee itself.
Some baristas find it more intuitive to focus on flow rate rather than pressure. Understanding how water moves through the puck as well as how resistance changes throughout the shot can make the extraction process easier to grasp.
There’s no single “correct” approach: pressure-based and flow-based approaches are just two different ways to understand the same system. If pressure curves feel confusing, try looking at your shot in terms of flow behavior instead. It might just click.
Brew Temperature
While you can set your brew temperature using the temperature control knob, there are other ways to 'over-ride' the Argos' temperature control system if you want to brew hotter or colder than the brew temperature setting selected.
Actual brew water temperature is influenced by:
- Boiler pressure; Higher pressure = higher water temperature
- Contact time between brew water and grouphead
To brew hotter than set brew temperature
You can manually control the boiler's temperature via activating Steam Mode, forcing the boiler to heat past what the brew temperature algorithm's set temperature limit.
This technique turns the Argos into a more traditional style manual dipper lever machine except with you acting in replacement of a pstat that limits boiler pressure.
Using either the Odyssey Espresso app to watch boiler temperature, or the manual boiler gauge, let the machine heat up and click the Argos back to Brew Mode once desired boiler temp/pressure is reached - this turns off the heating element, halting the rise in temperature.
Water retains heat well due to its high heat capacity, so you'll have more than enough time to pull your shot before the boiler starts to cool down significantly.
To brew cooler than set brew temperature
It is possible to start pulling your shot even before the temperature ready light goes on, as long as there is enough boiler pressure to push water into the brew chamber.
If your boiler is hotter than desired and you want to drop boiler temperature open the steam wand briefly to bleed off pressure. Close the steam wand once you've reached desired boiler pressure, and turn the machine off to prevent the water from heating back up due to the temperature algorithm. Water retains heat well due to its high heat capacity, so you'll have more than enough time to pull your shot before the boiler looses too much pressure and is unable to deliver brew water to the grouphead.
Note;
Dipper levers like the Argos also have a declining temperature over the duration of the shot. Many believe this is a desirable feature that lends itself to the smooth-tasting espresso that manual lever machines are known for.
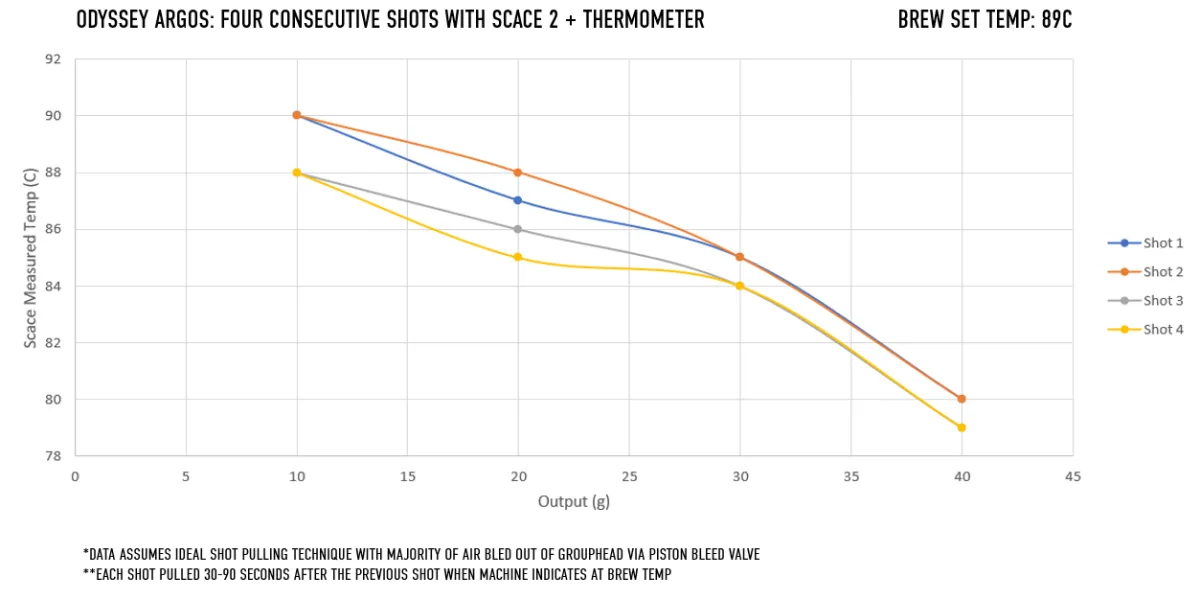
The longer the brew water sits in the grouphead before the percolation phase (piston is lowered), the more the water will continue to cool. Conversely, if you are pulling very fast flowing shots, actual brew temperature is likely to be higher as the grouphead (acting as a heat sink) does not have enough time to soak up excess heat. You see this most clearly when flushing the grouphead for a long period - the water exiting the group will start to flashboil.
Brew Output
In Spring Configuration or Direct configuration + v1 piston linkage, the full swept volume of the Argos' piston with a full brew chamber should net you around 43g of espresso in the cup, not including the espresso that might have dripped into the cup during the pre-infusion stage.
In Batch 2 machines with the longer throw V2 Piston Linkage, this swept volume in Direct configuration increases and should net you about 50g espresso out in the cup. Batch 1 customers who have installed this v2 linkage will see similar increases in output. Note that this upgrade will not effect output in Spring Config.
If you want less espresso in the cup:
- when you're about to reach target espresso weight, halt the movement of the lever to stop/slow the flow of espresso out, then remove your cup. Empty the rest of the espresso into the drip tray or catch cup
- practice filling the chamber only partially by not raising the piston all the way during the fill
If you want more coffee in the cup:
- allow more espresso to drip through during fill/pre-infusion to supplement your usual swept volume
-
perform a "Fellini" move, in which you first allow the piston to lower, pushing espresso out through the puck, then lift the piston all the way again to refill the brew chamber and commence the second part of the shot. The bleed-valve in the Argos' piston protects the puck from getting unseated during the manoeuvre.
For example, if you want a total of 60g of espresso and your usual output without a Fellini is 45g, perform the Felllini move when you have about 15g in your cup. 15g + 45g = 60g.
To help you decide if you need to increase or decrease your espresso yield to attain the taste results you want, check out Barista Hustle’s Espresso Compass.
Exploring Different Recipes
Now that you know the basics on how to manipulate different brew variables on the Argos, it's time to explore different espresso profiles!
This Espresso Profiling guide on the Espresso Aficionados wiki is a good place to start